
WWDC18, Session-712 Turi Create Highlights - Making ML Models is No Longer a Difficult Task
WWDC18, Session-712 Turi Create Highlights - Making ML Models Is No Longer Difficult
Photo by Jens Johnsson on Unsplash
What is Turi Create?
Before being acquired by Apple, it was known as Dato, a project developed under Graph Lab, funded by Prof. Carlos Guestrin from the University of Washington. It raised over $6 million in Series A and $18 million in Series B funding, before being bought by Apple in mid-2016. At WWDC17, there was a session that introduced this module, back then at version 4.0. At WWDC18, Session-712 provided a detailed introduction to this Python package, which also featured in ‘What’s new in Core ML’ (Sessions 708, 709), where the speaker directly demoed the software. (Ref1)
The Purpose of Turi Create
- It’s a Python Package that can create Core ML models and is open source.
- Simple and user-friendly, accessible even to those not specialized in ML.
- Allows iOS developers to focus solely on APIs.
- Cross-platform (Mac, Linux).
- Low learning curve, especially on Mac where Python 2.7 is pre-installed. Just need
pip install turicreate. Creating an object recognition model requires less than 20 lines of code. Using Jupyter Notebook as shown at WWDC18 is not mandatory. For installation, see (Ref2).
Identifying Whether a Person in a Photo is Takeshi Kaneshiro
The following article uses Turi Create to make a simple Takeshi Kaneshiro recognition App. If you’re interested in trying it out, check this out:
Five Steps Needed Before Building a Machine Learning Model

Steps Required for Machine Learning
Step 1: Clearly define your task as Turi Create (or ML in general) might offer different optimal algorithms depending on your specific task. If you choose the wrong one, your model might not perform as expected.
Step 2: Gather the necessary data for your task. For image recognition, you need images in folders named after their labels. For object detection, you need labels and coordinates in a JSON file.
Step 3: Generate your model file using Turi Create, which can be done in under 20 lines of code.
Step 4: Validate your model. Typically, training data is split in an 80:20 ratio. Use the 20% to test the model. If accuracy is low, consider increasing the max_iterations or adjusting other parameters.
Step 5: If validation is successful, integrate the model into your app and publish.
1. Defining the Task
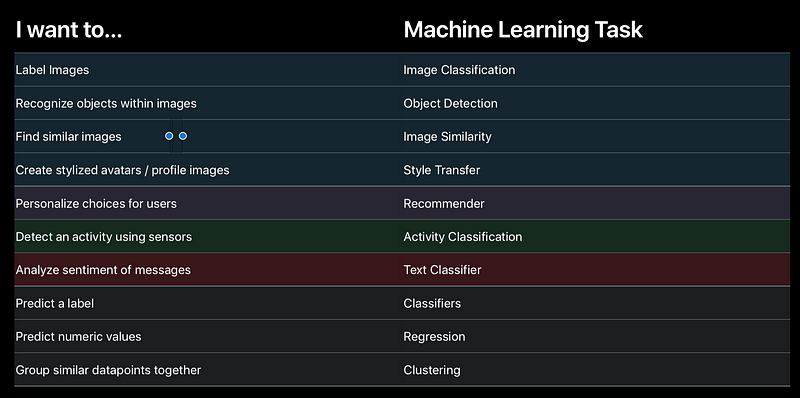
Tasks executable within Turi Create
Common ML Tasks used in Apps
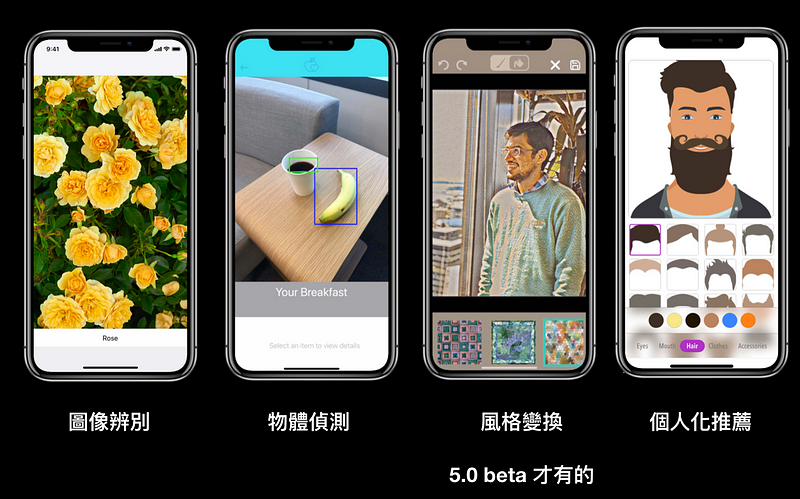
All types of tasks available in Turi Create are listed in the table above. You can select the corresponding API based on your project needs. The four tasks shown are the most commonly used in apps. Note that the style transfer feature is only available from version 5.0 beta; it was not included in 4.0.
2. Input Data for Model Training
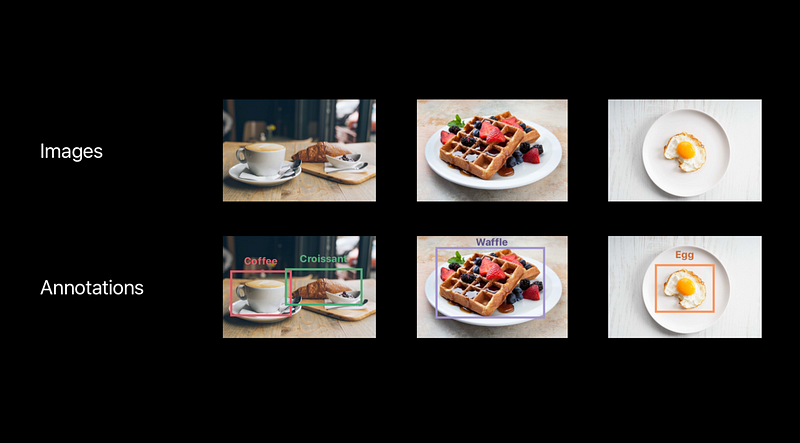
The top row shows image classification tasks requiring only images and folder names. The bottom row shows object detection tasks needing labels and bounding box information in addition to images.
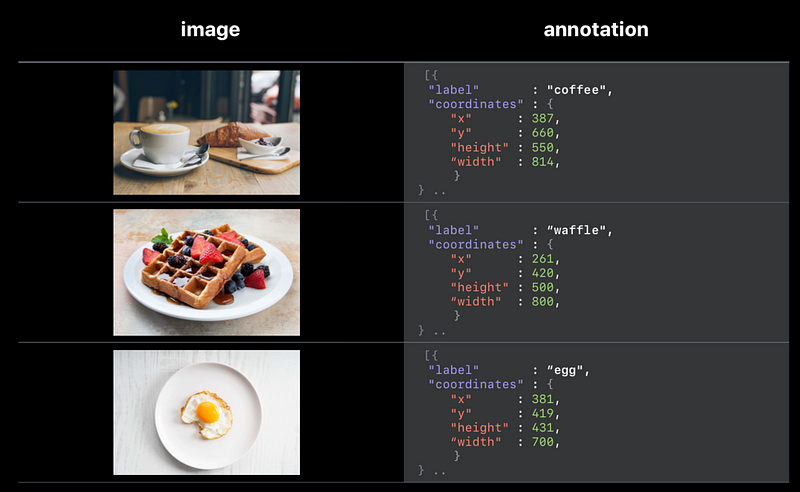
For object detection, you must input annotation data, usually a JSON file that allows multiple objects to be tagged in one image, each element containing a label and coordinates for a bounding box.
Depending on your task, input the appropriate data. For image classification tasks, simply place images in their respective folders. For object detection, you will need to provide additional information about the names and coordinates of objects to be recognized in the images.
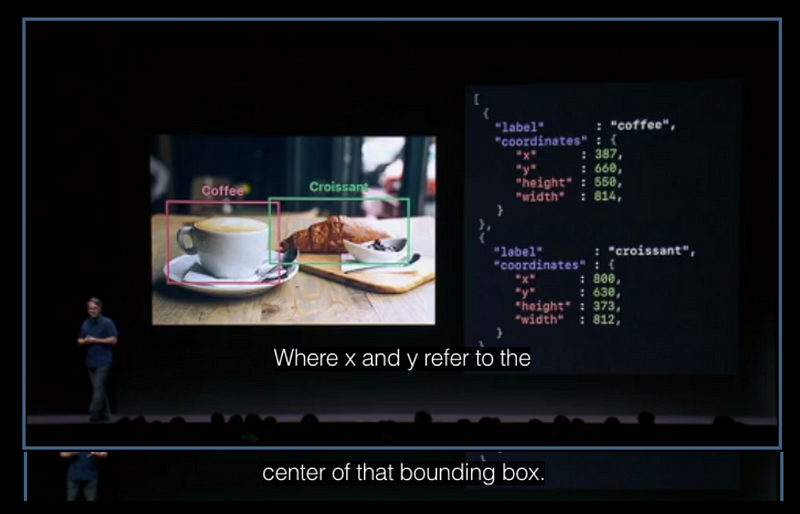
Note that in Turi Create, the X and Y coordinates represent the center point of the bounding box, not the top-left corner as in UIKit.
3. Generating the ML Model
The WWDC18 sessions used Jupyter Notebook for demonstrations, requiring minimal coding—only 11 lines. Let’s use “Is this a photo of Takeshi Kaneshiro?” as an example.
import turicreate as turi

url = “dataset/”

data = turi.image_analysis.load_images(url)

# If the photo is not in the 'Kaneshiro' folder, label it 'Unknown'
data["kaneshiroOrNot"] = data["path"].apply(lambda path: "Kaneshiro" if "kaneshiro" in path else "Unknown")

data.save("kaneshiro_or_not.sframe")

data.explore()
The above code outputs the data in SFrame format, including the URL line, in just 5 lines.
Steps to Create the ML Model:
-
Load the Data: Load your data into an SFrame.
-
Split into Training and Test Data: Randomly split the data into training (80%) and testing (20%) sets. Adjust the ratio as needed.
-
Create the Model: Use
image_classifier.createfrom Turi Create, specifying the task type and other parameters likemax_iterations.
# Load the data
data = turi.SFrame("kaneshiro_or_not.sframe")

# Split the data
train_data, test_data = data.random_split(0.8)

# Create the model
model = turi.image_classifier.create(train_data, target="kaneshiroOrNot", max_iterations=100)

# Make predictions
predictions = model.predict(test_data)

# Evaluate the model
metrics = model.evaluate(test_data)
print(metrics["accuracy"])

# Save the model
model.save("kaneshiro.model")

# Export to Core ML format
model.export_coreml("kaneshiro.mlmodel")
4. Validating the Model
Making Predictions: Use the trained model to make predictions on the test data that was not used during training.
Validating the Model:
Check the accuracy of the model. If it is low, consider adjusting parameters like max_iterations.
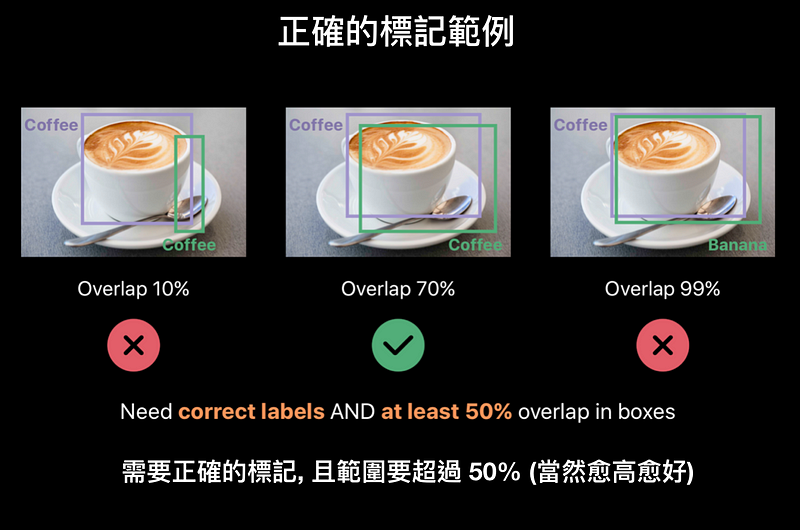
Two key points to validate: 1) The labeling is correct, 2) The labeled bounding box covers at least 50% of the correct area.
Saving the Trained Model: After training, save the model file.
Converting to Core ML Format: Convert the trained model into a format usable by Core ML.
5. Deploying to an App
Integrate the exported .mlmodel file into your project.
This completes the creation of your ML model.
For further reference, the Jupyter Notebook code used in the demonstrations is available on the following GitHub repository. Navigate to the Jupyter Notebook folder to find three examples: KaneshiroOrNot, SoupOrRice, and Adventure, which distinguish images of Takeshi Kaneshiro, identify whether an image is of soup or rice, and recognize which character from the Avengers is depicted, respectively.
References:
- Turi company acquired by Apple
- Setting up Jupyter Notebook on Mac
- Example Code
- Implementing a Takeshi Kaneshiro Recognizer
By Marvin Lin on August 12, 2018.